header-picture

Coordination of breathing and bodily move­ments

Certain exercises develop har­mo­ni­ous co­or­di­na­tion of the breath­ing and bodi­ly move­ments in an almost play­ful way and pre­pare you for more chal­leng­ing ex­er­cis­es.

These exercises are very help­ful for the un­trained, for sen­iors and for peo­ple with med­i­cal con­di­tions (after con­sult­ing their phy­si­cian or the yoga teacher).

Even without practising other ex­er­cis­es, the given se­quence will ben­e­fit the body and calm the mind.

Some standing posture ex­er­cis­es are suit­able for those need­ing to sit on a chair in­stead.

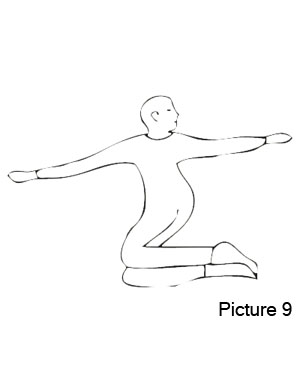
The figure and the description of the ex­er­cise is pref­er­a­bly viewed side by side. This is either pos­sible with the desk­top version of this web­site or with the fol­low­ing PDF-file:

Breath-body co­or­di­na­tion.pdf

Return to the Yoga top level page

The following exercises develop har­mo­ni­ous co­ordi­nation of the breath­ing and bodily move­ments in an almost play­ful way and pre­pare you for more chal­leng­ing exercises.

These exercises are very help­ful for the un­trained, for sen­iors and for people with medical con­di­tions (after con­sult­ing their physician or the yoga teacher).

Even without practising other exercises, the following se­quence will benefit the body and calm the mind.

Some standing posture exercises are suitable for those need­ing to sit on a chair instead.

Picture 1 - Welcome

1. Welcome

  • Starting position: Mountain posture (stand­ing straight, feet to­geth­er or a lit­tle apart, arms relaxed by the sides of the body).
  • Raise the stretched arms in front of the body and bring the palms to­geth­er (Picture 1a).
  • While breathing in spread the arms side­ward (Picture 1b).
  • While breathing out bring the palms to­geth­er again.
  • Do this five times slowly, continuously and syn­chro­nous­ly with the breath­ing rhythm.
  • Return to the starting position and be aware of the changes of the breath­ing and the sen­sa­tions in the arms, shoulders and neck.
Picture 2 - Hands stretch breathing

2. Hands stretch breathing

  • Starting position: Mountain posture (stand­ing straight, feet together or a lit­tle apart, arms relaxed by the sides of the body).
  • Interlock the fingers and place them on the chest. Relax the shoul­ders (lower them) (Picture 2a).
  • a) 90º - horizontal
    While breathing in stretch the arms forward to shoul­der level and twist the hands, palms fac­ing out­ward. Stretch the arms com­plete­ly with­out exerting too much effort (Picture 2b).
    While breathing out reverse the movement. Place the hands on the chest and relax the shoul­ders (repeat three to five times).
  • b) 135º
    Do the same exercise but raise the straight arms an additional 45º above the horizontal plane.
  • c) 180º - vertical
    Do the same exercise but raise the straight arms to the vertical, hands above the head. Keep the hands close to the nose when moving the arms up and down.
  • Coordinate the movements of the arms and hands and pay attention to breath­ing dur­ing the entire exercise.
  • Return to the starting position and be aware of the changes of the breath­ing and the sen­sa­tion in the arms, shoul­ders and neck.
Picture 3 - Ankle / Body stretch breathing

3. Ankle / Body stretch breathing

  • Starting position: Mountain posture, palms resting on the thighs, eyes looking straight (Picture 3a).
  • While breathing in, raise the straight arms to the vertical, come up on your toes and stretch the body (Picture 3b).
  • While breathing out, return the heels to the floor and the hands to the thighs.
  • Do this five times slowly, continuously and synchronously with the breathing rhythm.
  • Return to the starting position, let the arms hang loosely by the sides of the body and be aware of the changes of the breathing and the sensations in the feet, legs, arms and shoulders.
Picture 4 - Tiger (cat and cow) breathing

4. Tiger (cat and cow) breathing

  • Starting posture: Japanese sitting (sit on your heels). Lean forward and place the hands flat on the floor in line with the shoulders, fingers pointing forward. Hands, knees and heels should be about shoulder width apart. The arms and thighs are per­pen­dic­u­lar to the floor, the back is straight.
  • While exhaling arch the spine upwards and bend the head down­wards bringing the chin towards the chest, look towards your navel – Cat posture (Picture 4a).
  • Inhaling raise the head and look at the ceiling, thus curving the neck downwards.
  • Continue the movement by curving the spine vertebrae by vertebrae downward, thus making it concave – Cow posture (Picture 4b).
  • Exhaling, starting at the lower back, ver­te­bra by ver­te­bra curve the spine upwards, finally bend the neck, suck the stomach in and look to your navel. Do not drop the head immediately when starting to exhale.
  • Do not bend the arms or move the thighs forwards and back­wards. Do not exert much effort – it is primarily a relaxation exercise.
  • This is one round of Tiger breathing. Do 10 rounds.
  • Rest in one of the relaxation postures while lying on the back (see Pictures 1a/b, Relaxation and transitions).

    Return to Complete yoga–breathing sequence

Picture 5 - Unsupported bridge

5. Unsupported bridge

  • Starting position: Lie on your back, feet parallel and hip wide apart close to the buttocks on the floor. Place the straight arms, palms down, close to the body on the floor or bring the straight arms, palms up, behind the head on the floor.
  • While inhaling rise the buttocks 10-20 cm above the ground (Picture 5).
  • Shoulders and feet are pressing firmly against the ground.
  • While exhaling return the buttocks to the floor (do 5 times).
Picture 6 - Leg raise breathing

6. (One) Leg raise breathing

  • Starting position: Lie on your back, legs straight, feet and knees together, arms by the side of the body, palms down.
  • While inhaling raise the straight left leg slowly as high as comfortable (if possible to the vertical). The right leg stays in contact with the floor (Picture 6).
  • While exhaling return the leg slowly to the floor.
  • Repeat with the right leg. This is one round. Do 3-5 rounds slowly and continually according to your breathing rhythm.
  • If your back is healthy and after having trained it with the above exercise for some time you can now try to lift both legs simultaneously to the vertical (3 times).
  • Rest in one of the relaxation postures while lying on the back and be aware of the changes of the breathing and the sensations in abdomen and lower back.
Picture 7 - Nose to the knee

7. Nose to the knee

  • Starting position: Lie on your back, legs straight, feet and knees together, arms by the side of the body, palms down.
  • Variation (I): Bend the right knee, place the left hand on the knee and the right one on top of the left, and pull the knee towards the chest. Keep the straight left leg on the floor. Breathe in.
  • While exhaling lift the head off the floor and try to bring the nose to the right knee (Picture 7a). While inhaling return back and head to the floor (do 3 times).
  • Return the right leg to the floor and do the exercise with bent left knee (right hand on the left knee and left hand on top of the right).
  • Bend both knees, grasp the knees with both arms and pull the knees close to the chest. Exhaling lift the head and try to bring the nose between the knees (Picture 7b). Inhaling return back and head to the floor (do 3 times).
Picture 8 - Diagonal arm and leg lifting

8. Diagonal arm and leg lifting

  • Starting position: Lie on your front, legs straight, feet, and knees together, straight arms in front of the head on the floor, forehead on the floor.
  • While inhaling raise the straight right arm and left leg off the floor (not too high), forehead may be raised or kept on the floor (Picture 8).
  • While exhaling return arm and leg to the floor.
  • Next inhalation raise the left arm and right leg etc. Do this 5 times with each arm-leg combination.
  • Rest in one of the relaxation postures while lying on the front (see Pictures 2a/b, Relaxation and transitions) and be aware of the changes of the breathing and the sen­sa­tions in the lower back.
Picture 9 - Spinal twist

9. Spinal twist

  • Starting position: Lie on your back with the legs together and arms spread 90° sideways at shoulders level. Hands resting on the floor and palms should be facing towards the ceiling. Fold legs at the knees and place the feet on the floor close to the buttocks and inhale.
  • While exhaling lower the knees to the right towards the floor as far as comfortable and simultaneously turn the head to the left, looking to your left hand. It is not important that the knees touch the floor, but it is important, that both hands and both shoulders and at least one foot stay in contact with the floor all the time (Picture 9).
  • Then, while inhaling, raise the knees up to the vertical and bring the head to the center.
  • While exhaling lower both the knees to the left towards the floor and turn the head to the right, looking to your right hand.
  • While inhaling, bring the knees and the head back to center (to the starting position).
  • This is one round. Perform 10 times.

Download

This page can be downloaded as a pdf-file at:
Breath-Body Coordination.pdf (194 kB)

Return to the Yoga top level page